Green Cake

St. Patrick’s Day was last Monday. I enjoy the holiday, but it’s not because I am one-eighth Irish (in fact, I have very little personal connection to my European roots). It’s because I love the color green! Green holds a very close second place position to my favorite color, cornelian red (Let’s Go Red!). Green and brown were my main wedding colors (see below). And we all can agree that green has a positive connotation, especially this time of year.
IMG_3370
When I came across a recipe for a naturally green cake, on a new site I’ve been following, I couldn’t resist. It used up parsley I had been working through, and made a dent in a leftover package of mint. These herbs are frequently called for in the Mediterranean dishes I’ve been craving. Specifically, the first part of the mint was used in mint and pistachio tabbouleh I served alongside Red Pepper and Lamb Pita sandwiches.
DSC_6783
I was very intrigued by the recipe. The cake has an added benefit of freshening one’s breath. You can’t say that about just any dessert or breakfast item, can you?
DSC_6794
I didn’t have enough of the herbs for a full-sized cake, so I scaled it down to 1/4 of the original recipe. It is fairly easy to do if you have a kitchen scale and you can figure out divisions in your head, or, like me, you have a nerdy husband (or calculator) nearby.

For those of you without a kitchen scale, I tried to closely translate the ratios into measuring cups and spoons.

If I needed another reason to try it out, I saw that this recipe was adapted from a recipe in the cookbook from Roberta’s, a well-known restaurant in Brooklyn. I’ve only visited the restaurant once so far, and I can report only positive things about the food.

Roberta’s Parsley Cake
Adapted from Food 52’s Adaptation and scaled down by 75% to fit one 8″ cake pan (a smaller pan would work too)

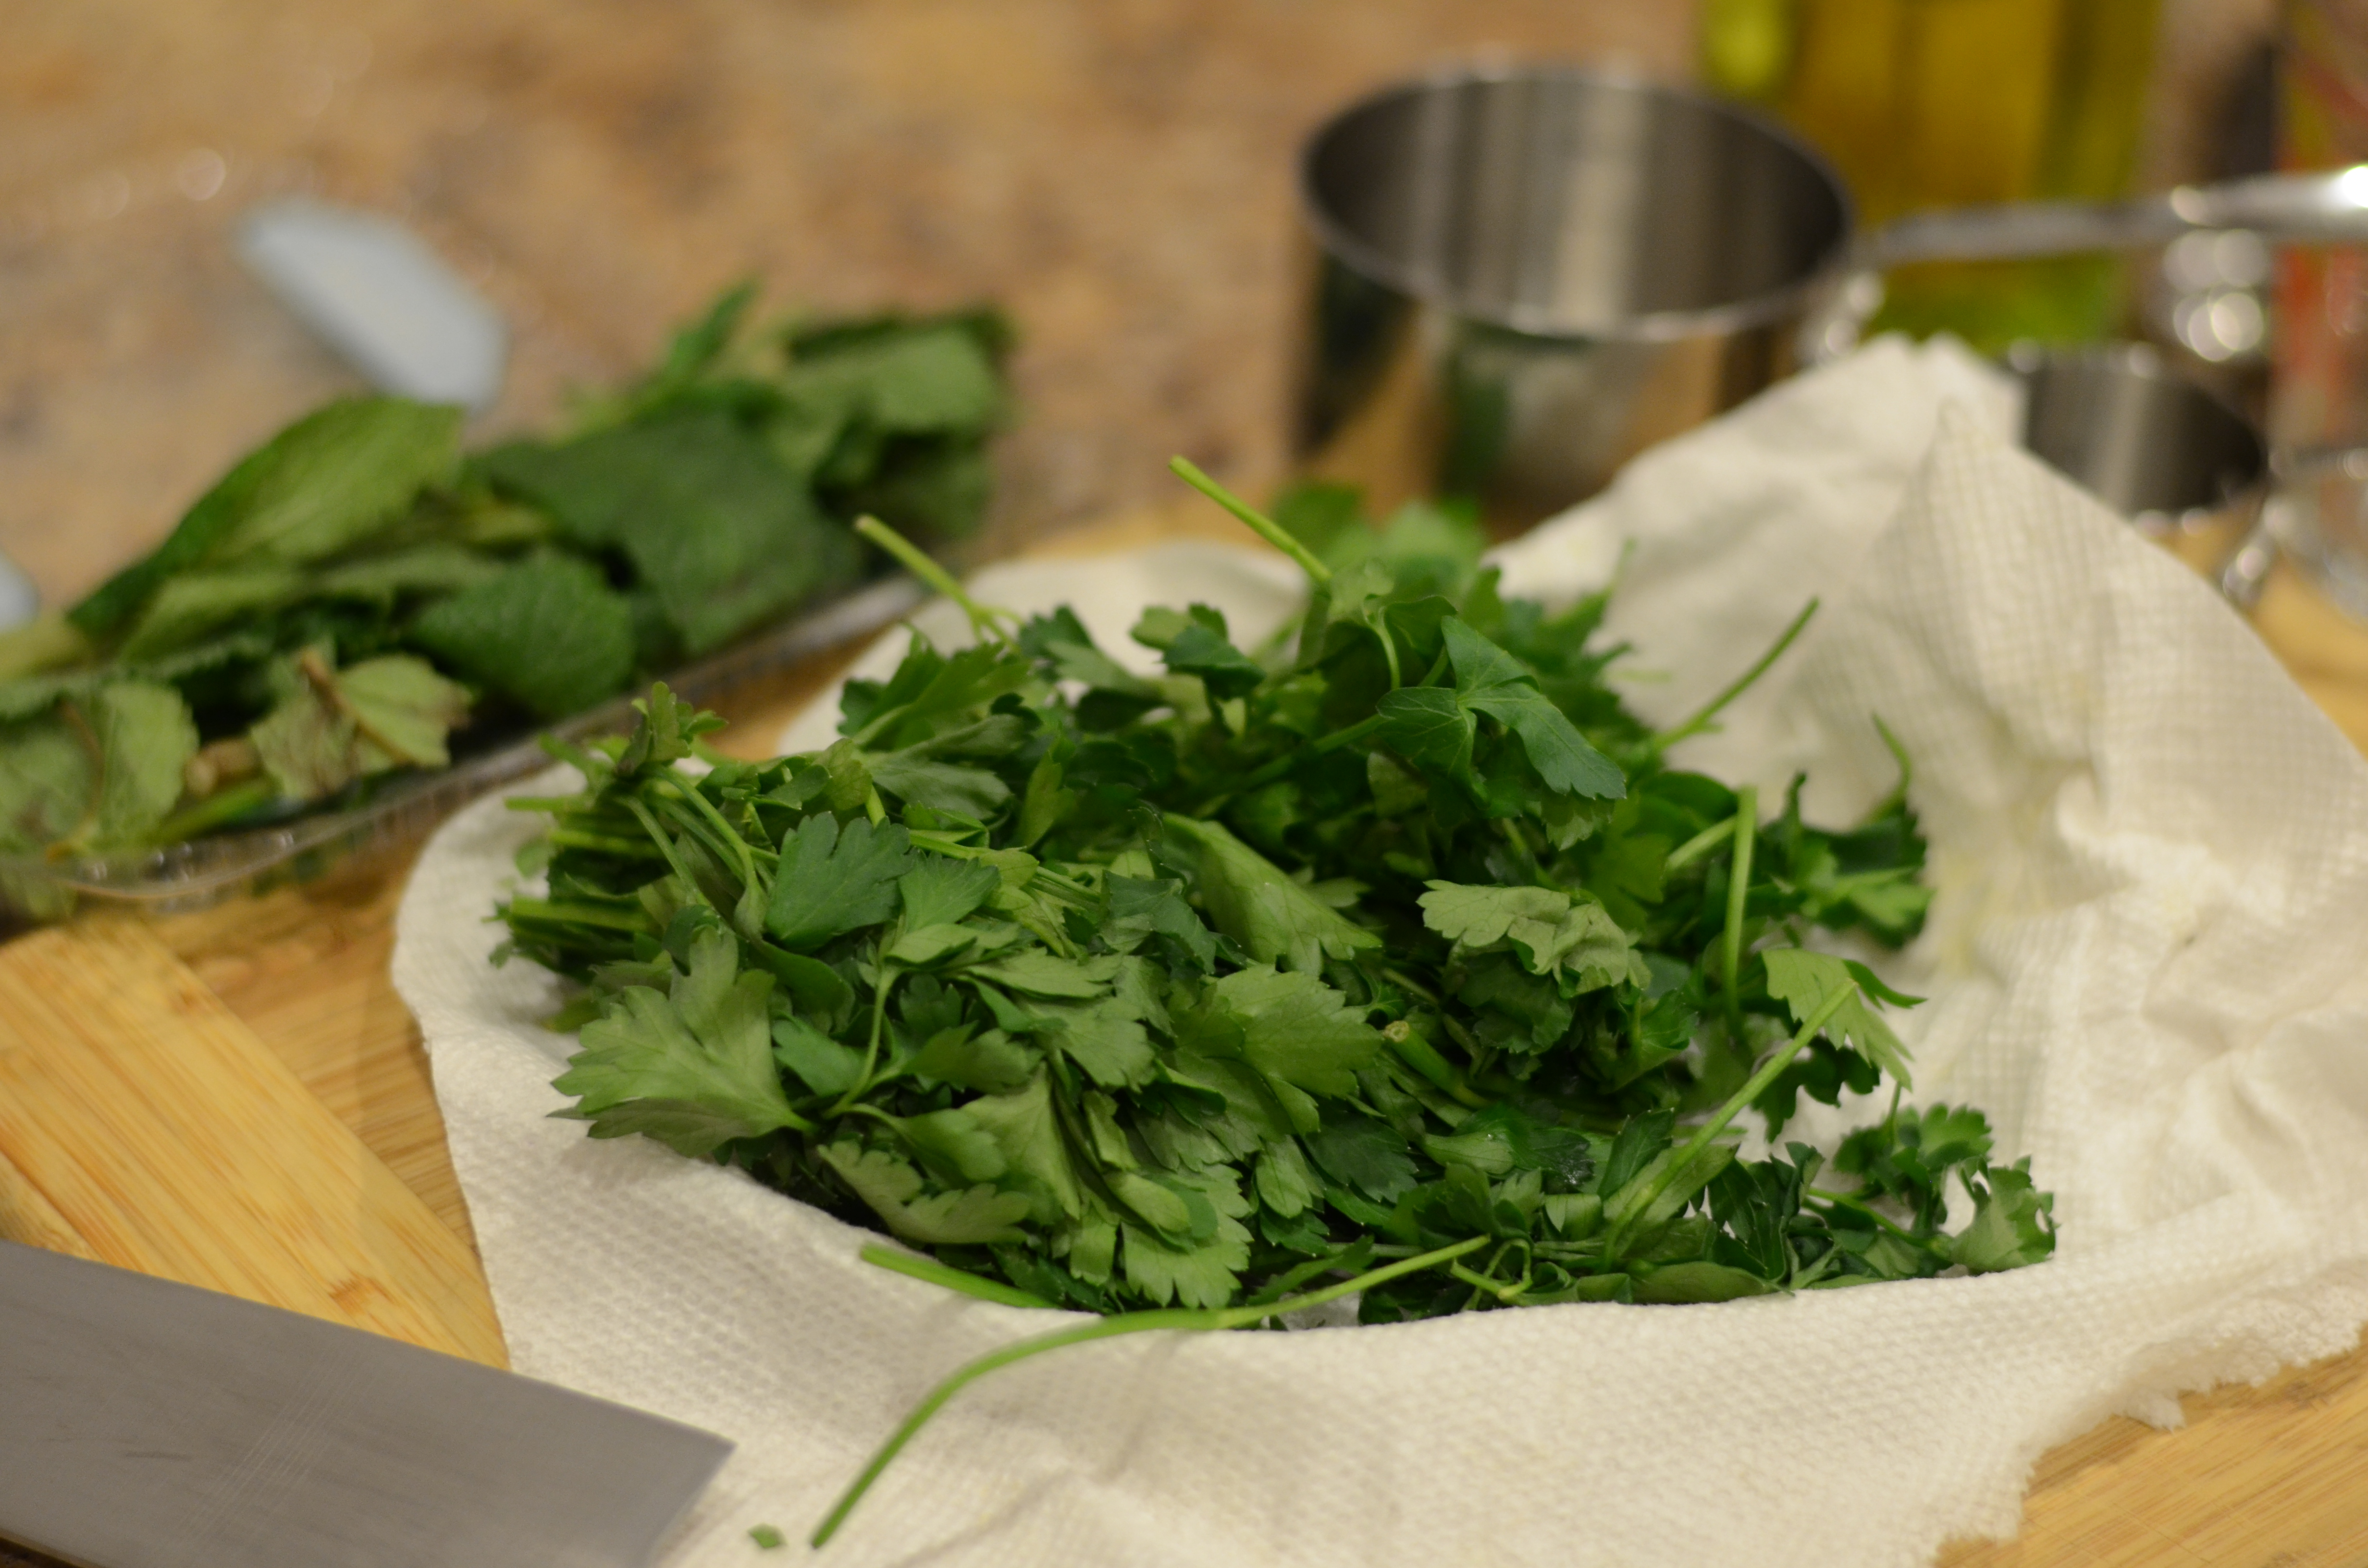
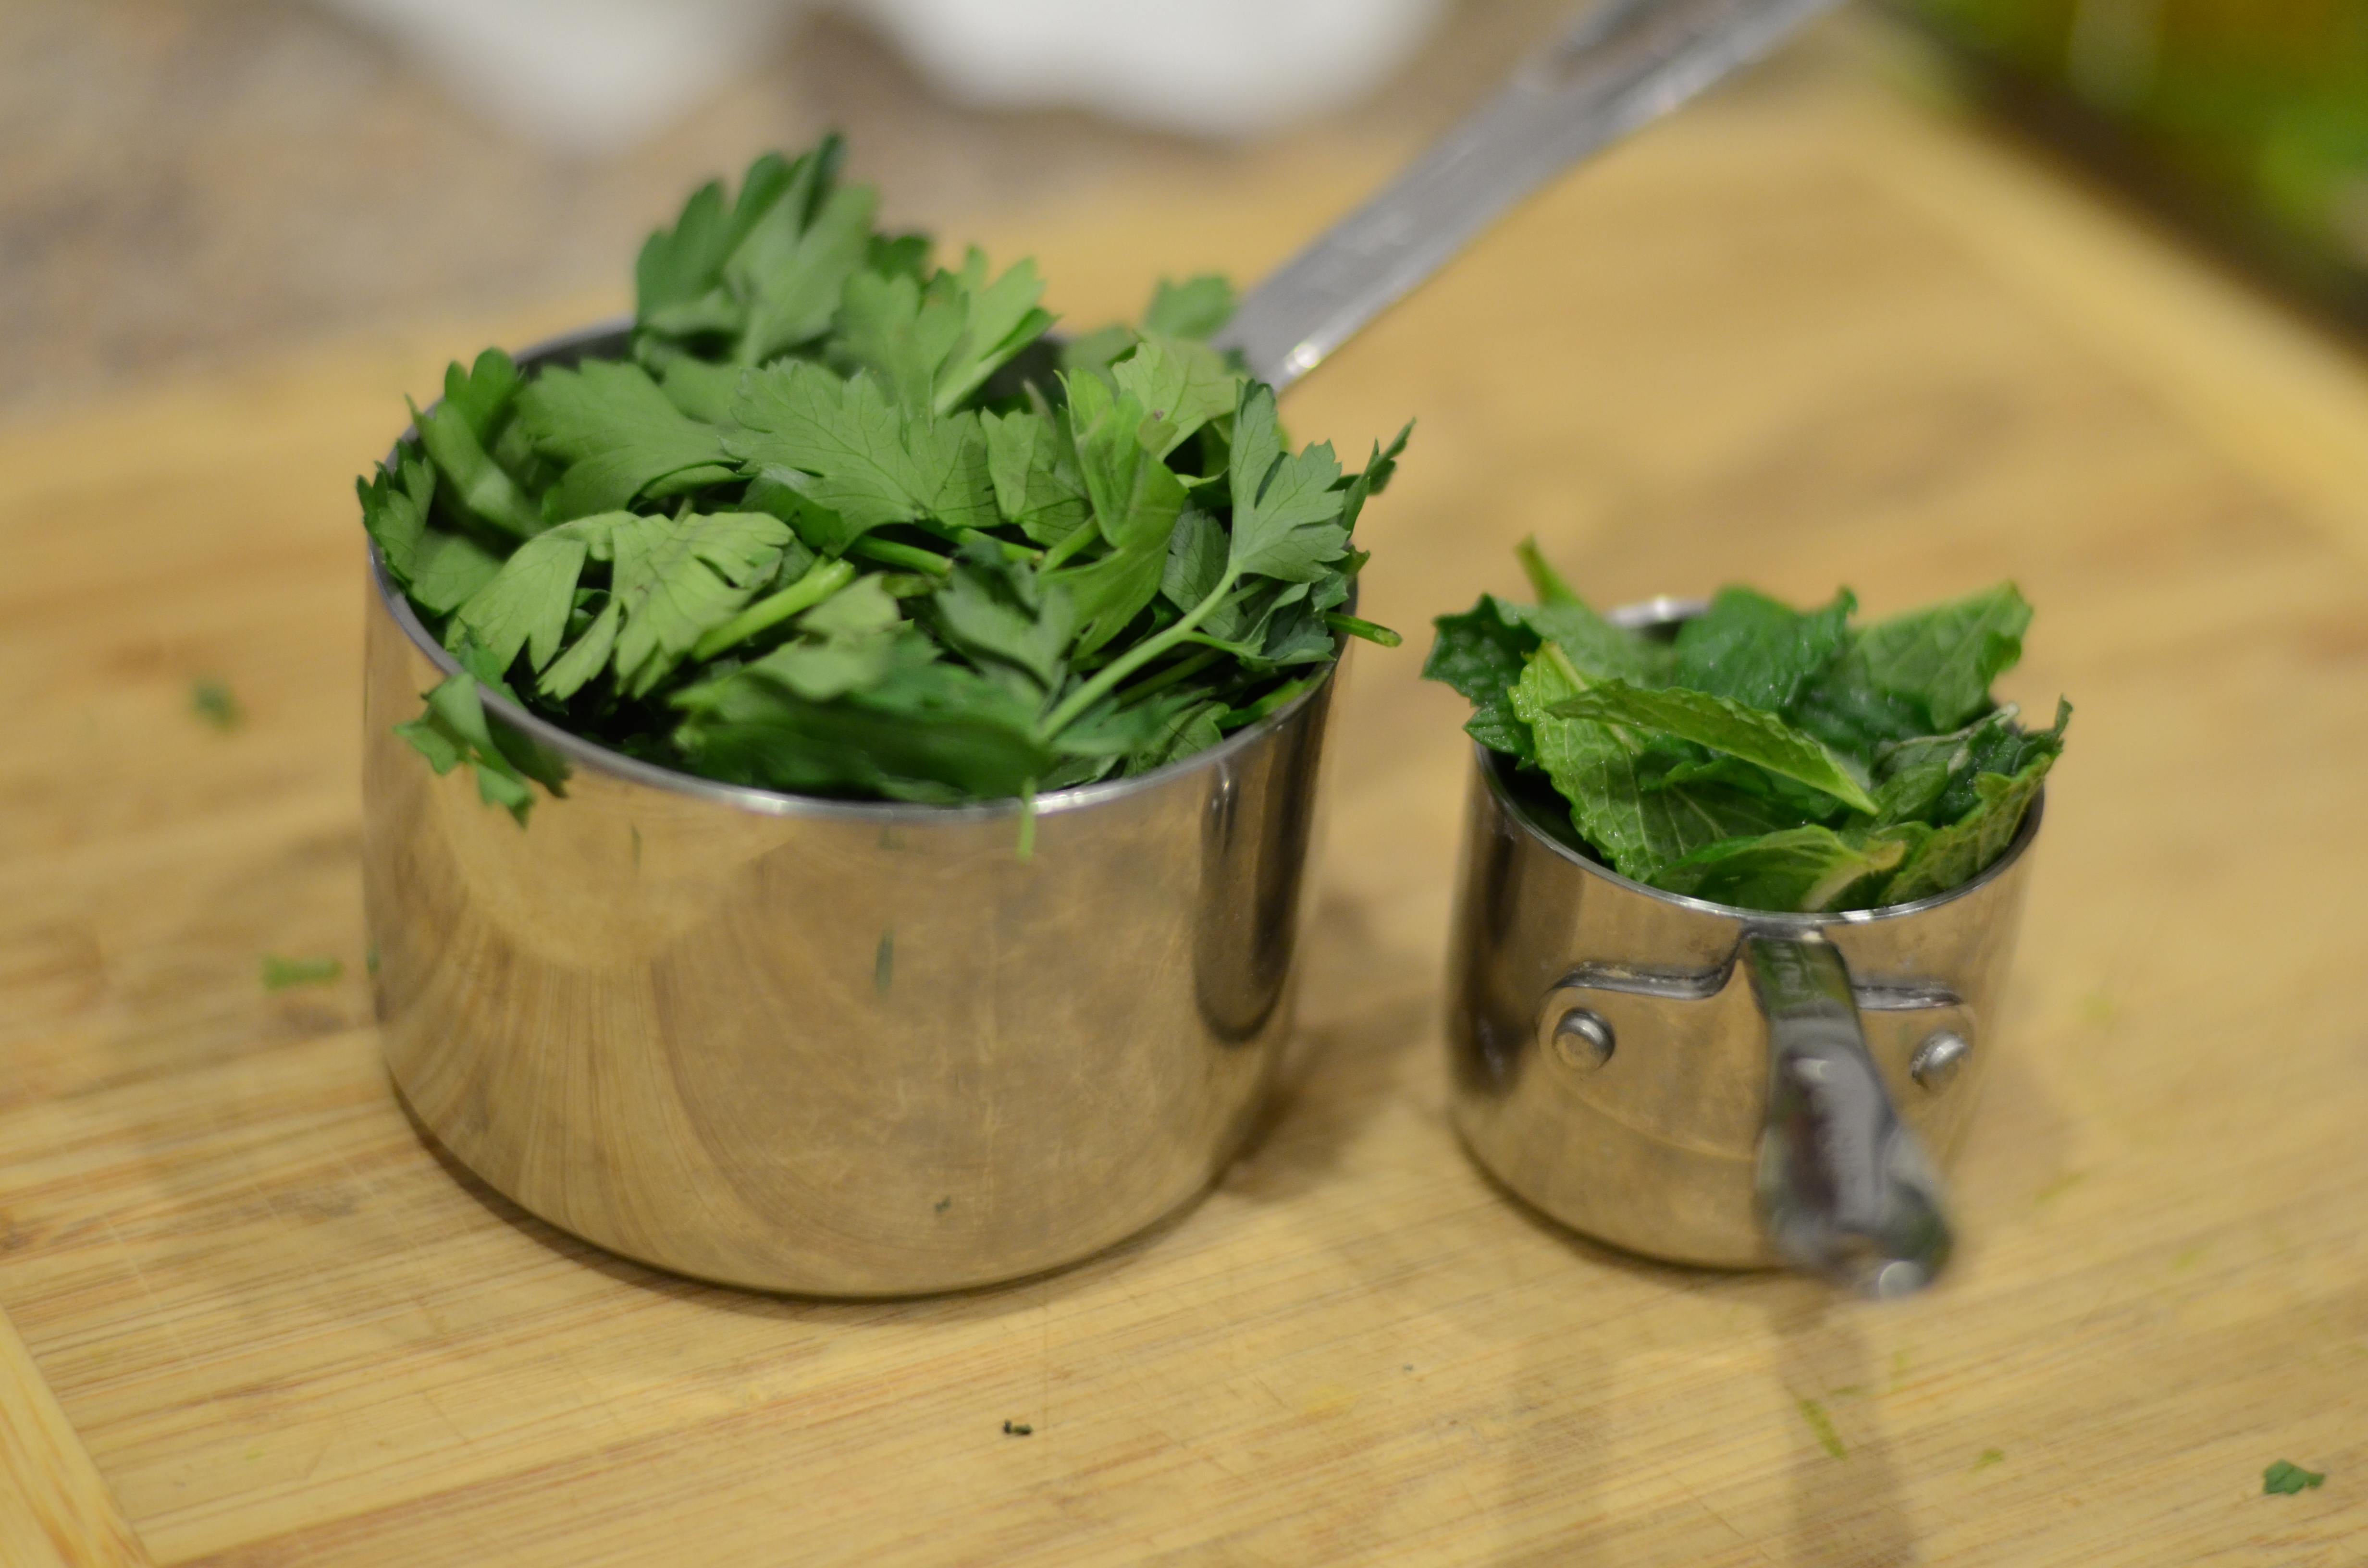
1 Cup parsley leaves, tightly packed
1/4 Cup mint leaves, tightly packed
41 grams (3/16 Cup, or a little more than 1/8 Cup) olive oil, plus oil for the pan
72.5 grams (a little over 1/2 Cup) all-purpose flour
3.75 grams (1 1/4 teaspoons) cornstarch
1.75 grams
(a little over 1/2 teaspoon) kosher salt
2 grams
(about 1/3 teaspoon) baking powder
1 large egg
, at room temperature
82 grams (a little less than 1/2 Cup) sugar

DSC_6786
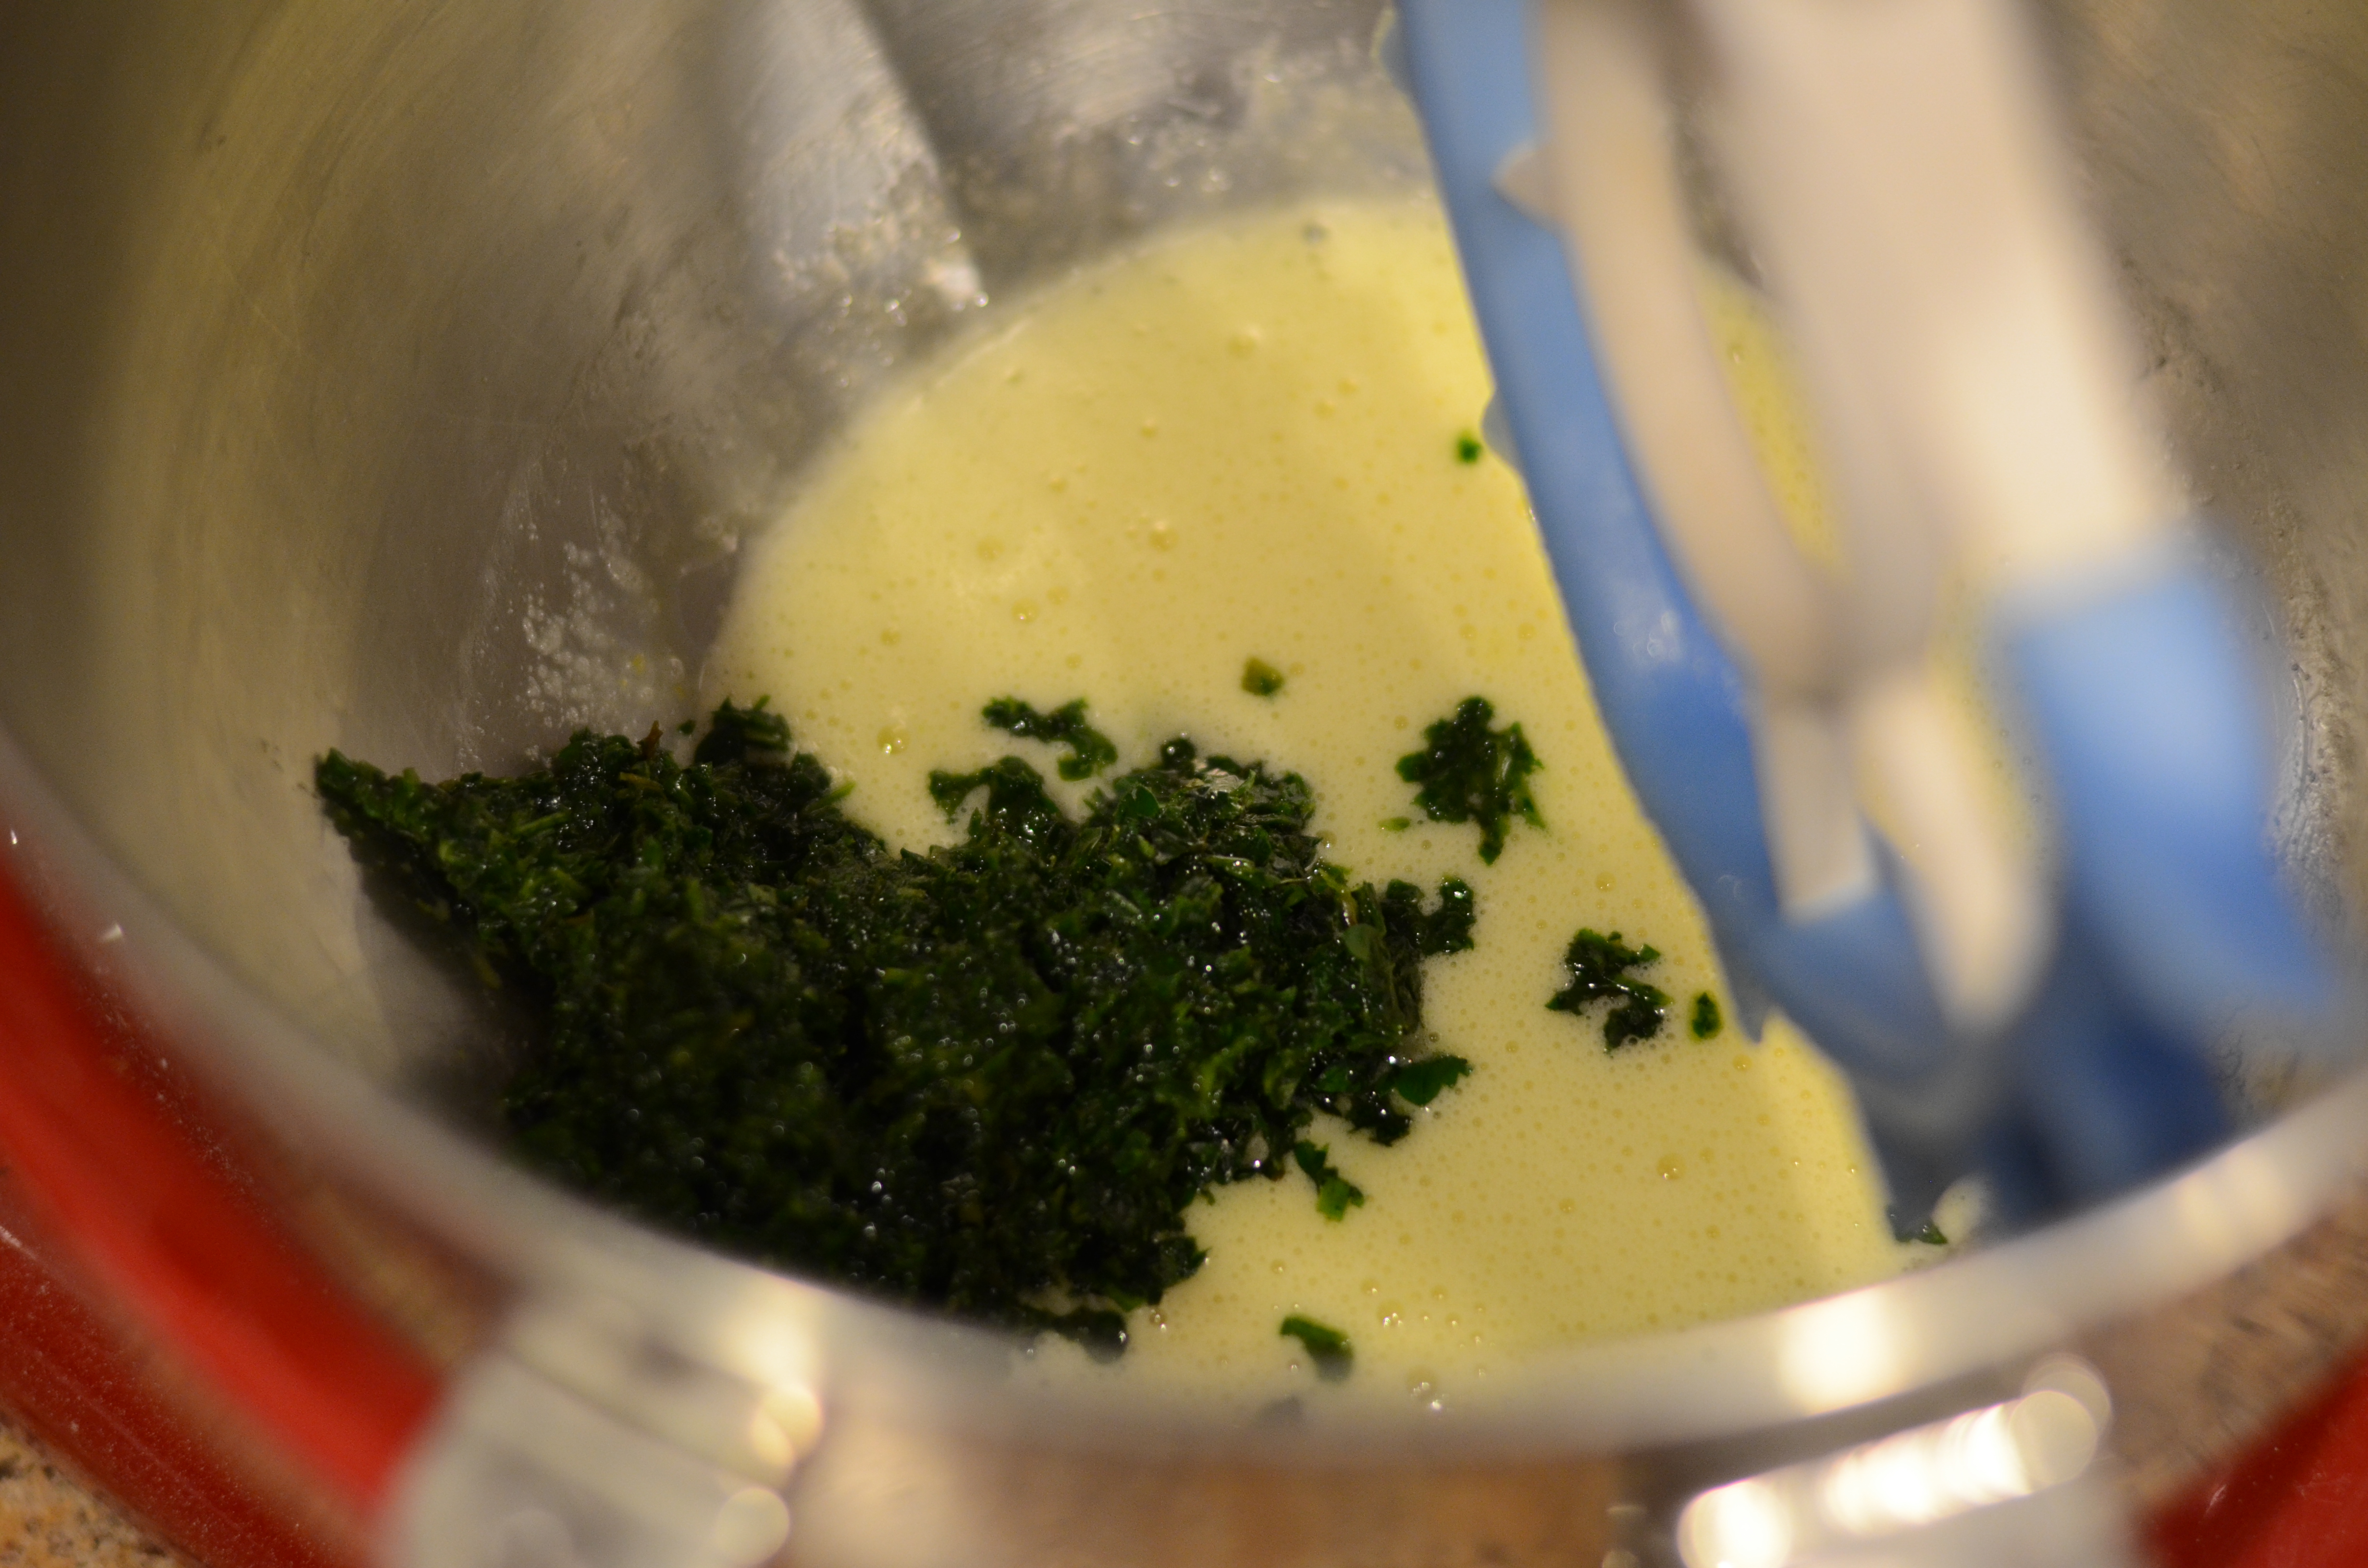
First, make the herb-oil mixture. Add parsley and mint to a blender or food processor, and process at low speed. You may need to stop from time to time to stir the herbs into the blade.
DSC_6788
Increase the speed to medium and add the olive oil, a little at a time, until mixture is fully combined. The recipe says to keep the mixture a little stringy rather than obliterating it. Use a rubber spatula to scrape all of the parsley mixture out of the processor/blender and into a bowl, and refrigerate until ready to use.
DSC_6793
In another bowl, combine the flour, cornstarch, salt, and baking powder.

In a stand mixer, whip the egg for about 30 seconds.
DSC_6795
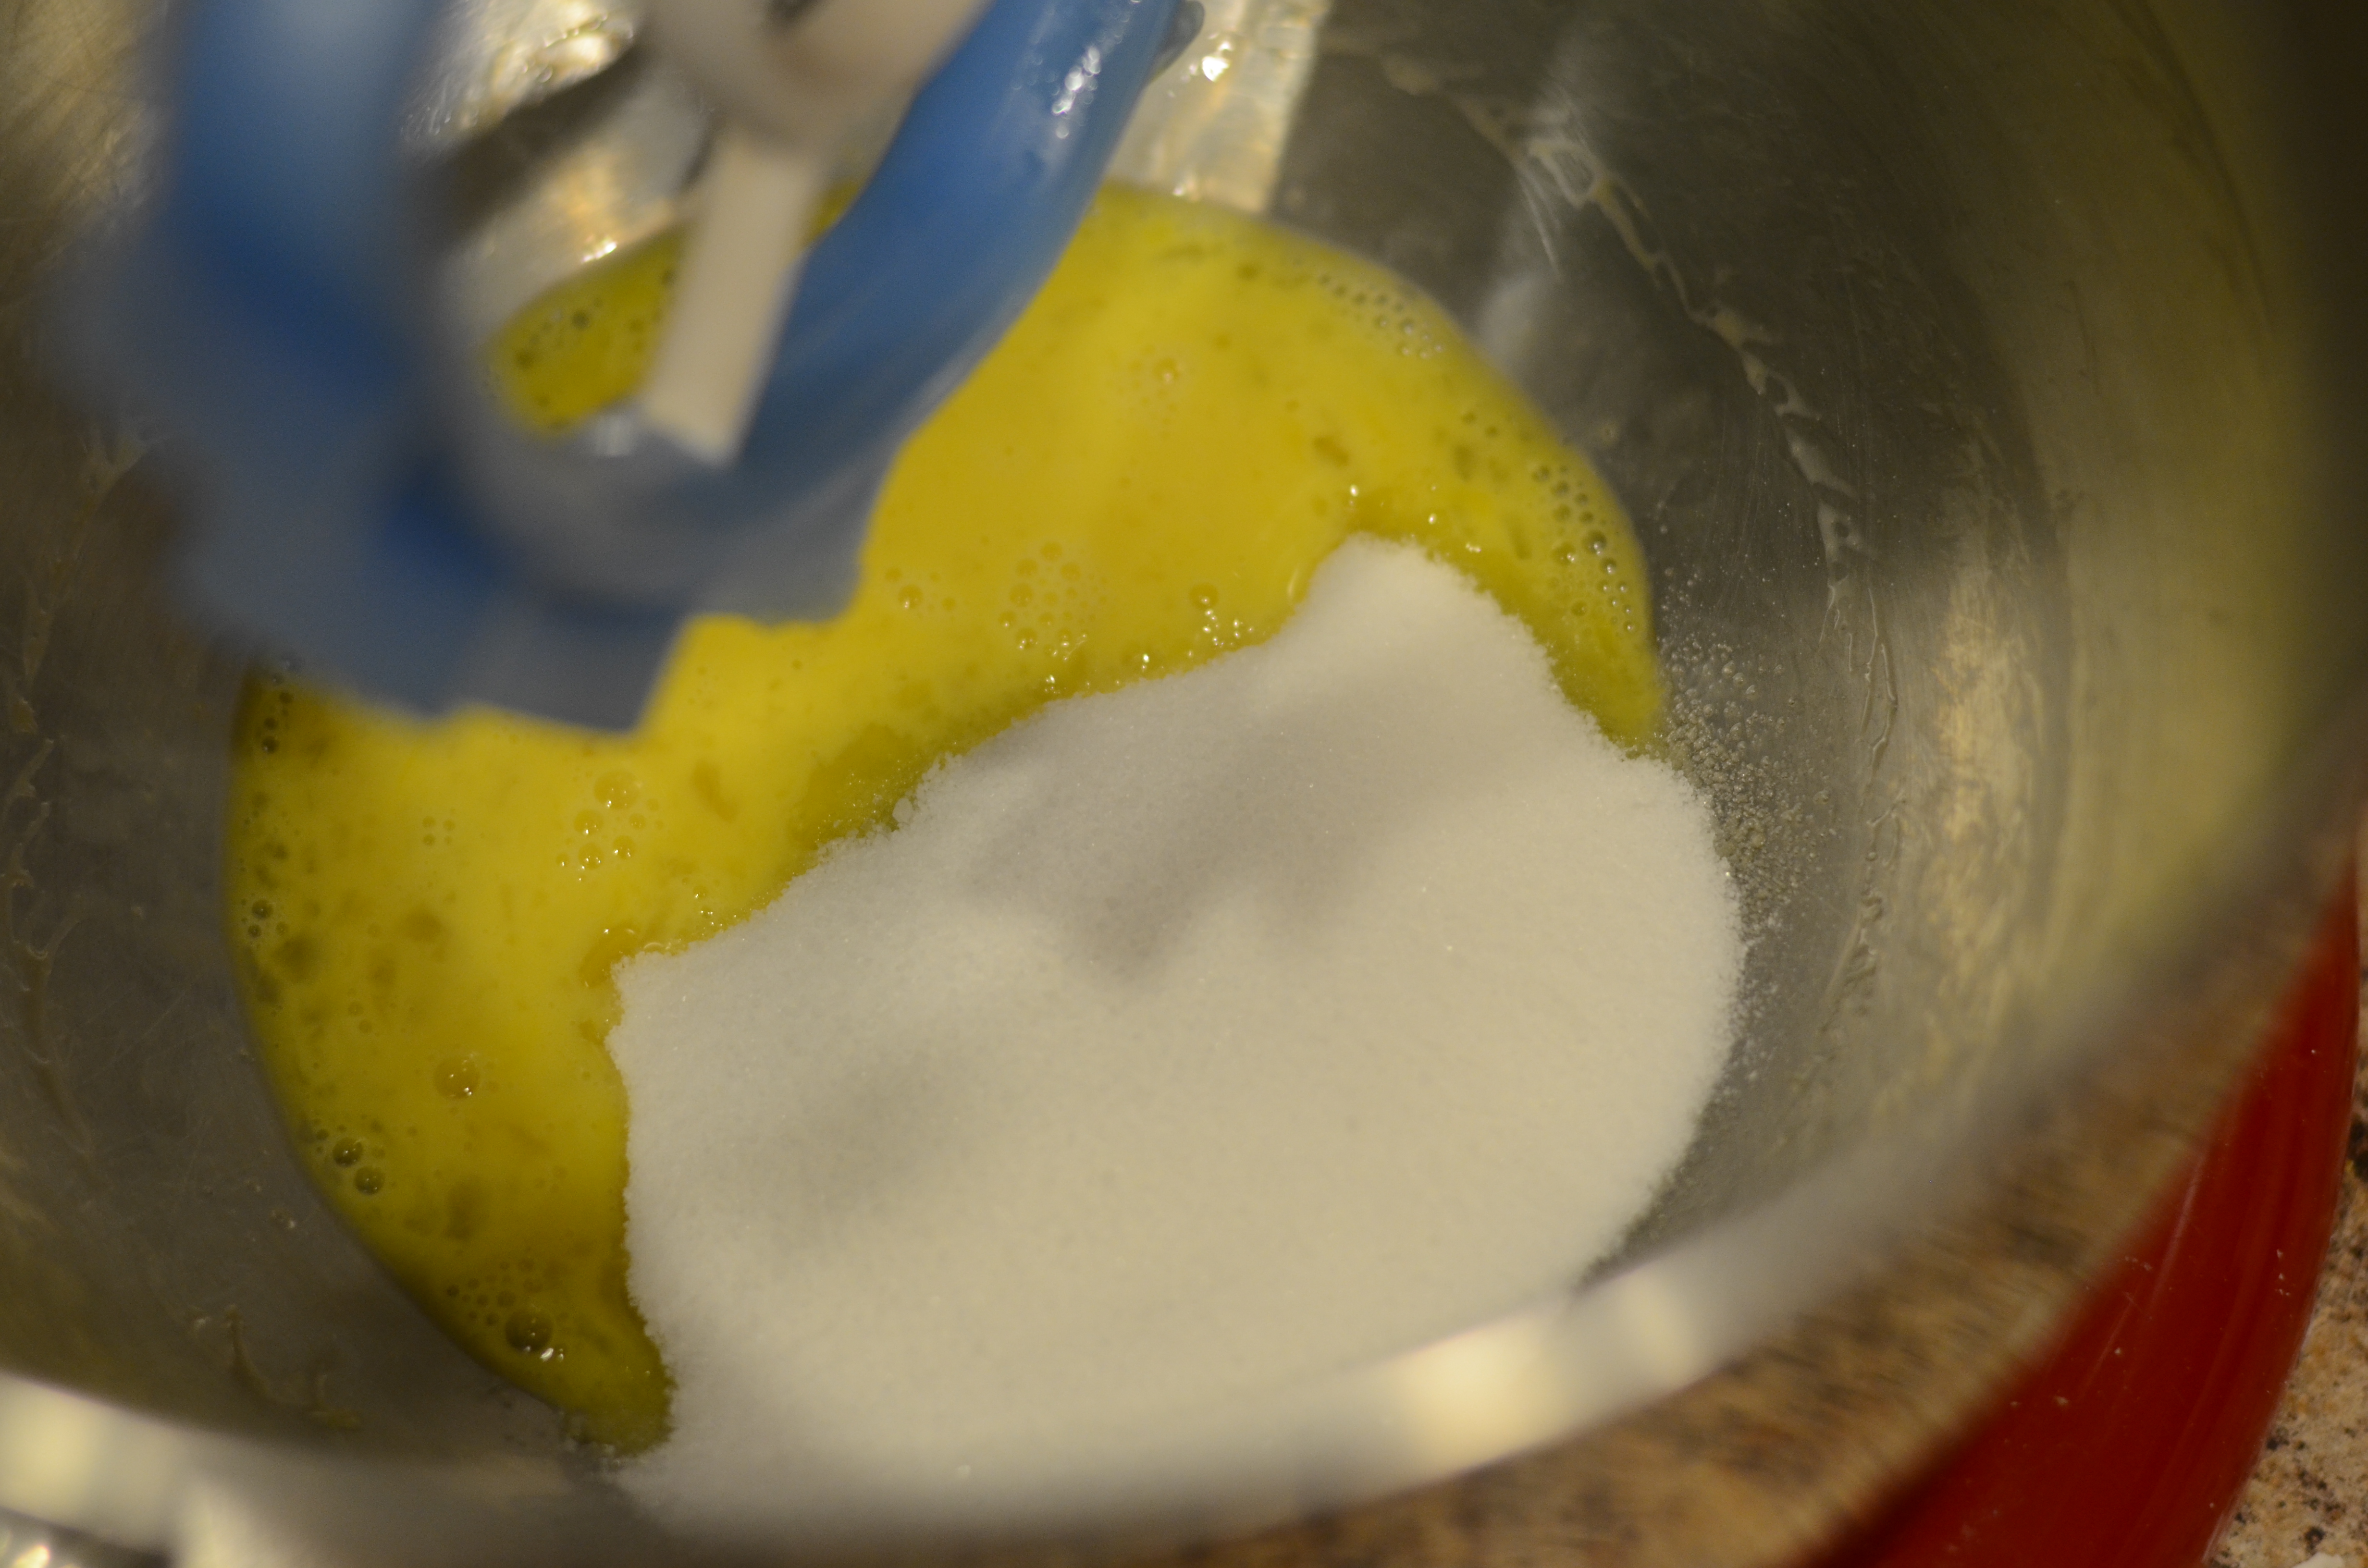
Add the sugar and turn up speed to high, running until the mixture is very thick and turns a pale yellow color, a few minutes.

Turn the mixer speed down to low and add the herb-oil mixture.
DSC_6797
With the machine on low, carefully add the dry mixture and mix until just combined.

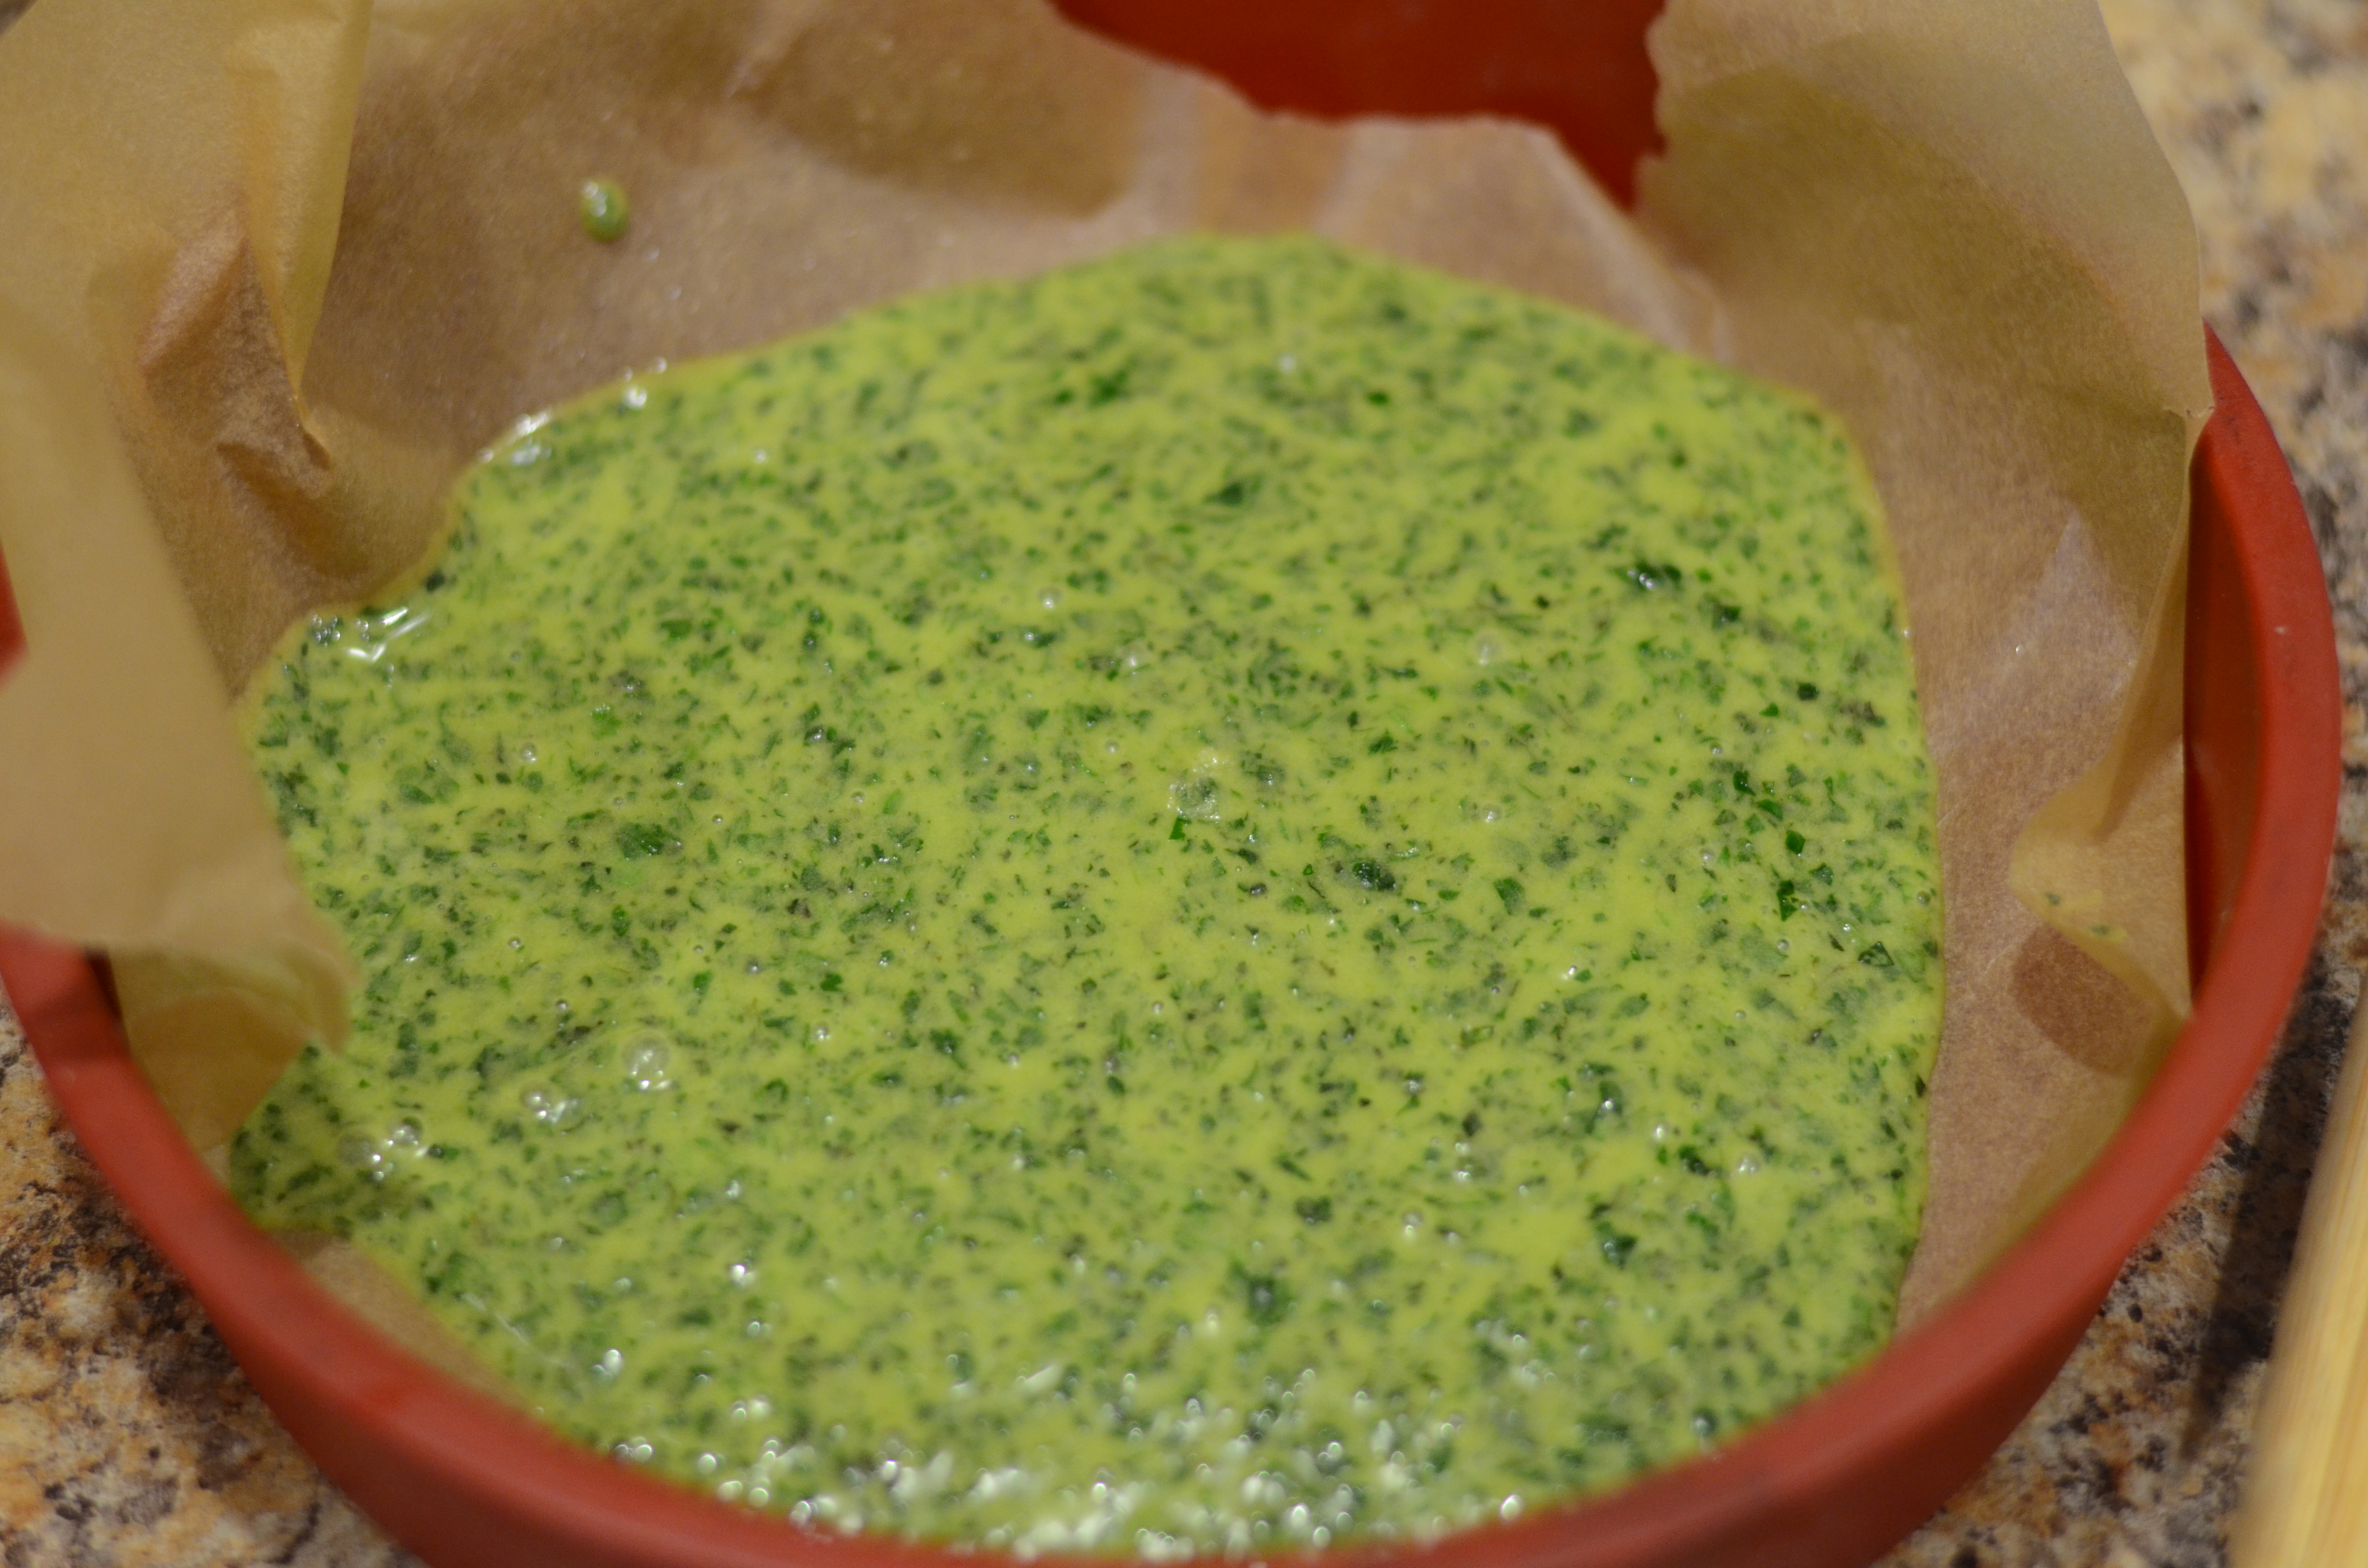
Refrigerate the mixture for at least 6 and up to 24 hours. This apparently develops the color. I transferred the mixture right away to my cake pan, which is lined with parchment paper and oiled, but you can also use a different container for the cake-batter-resting stage.
DSC_6799

How nice, my silicone lily pad lid fits perfectly!

How nice, my silicone lily pad lid fits perfectly!


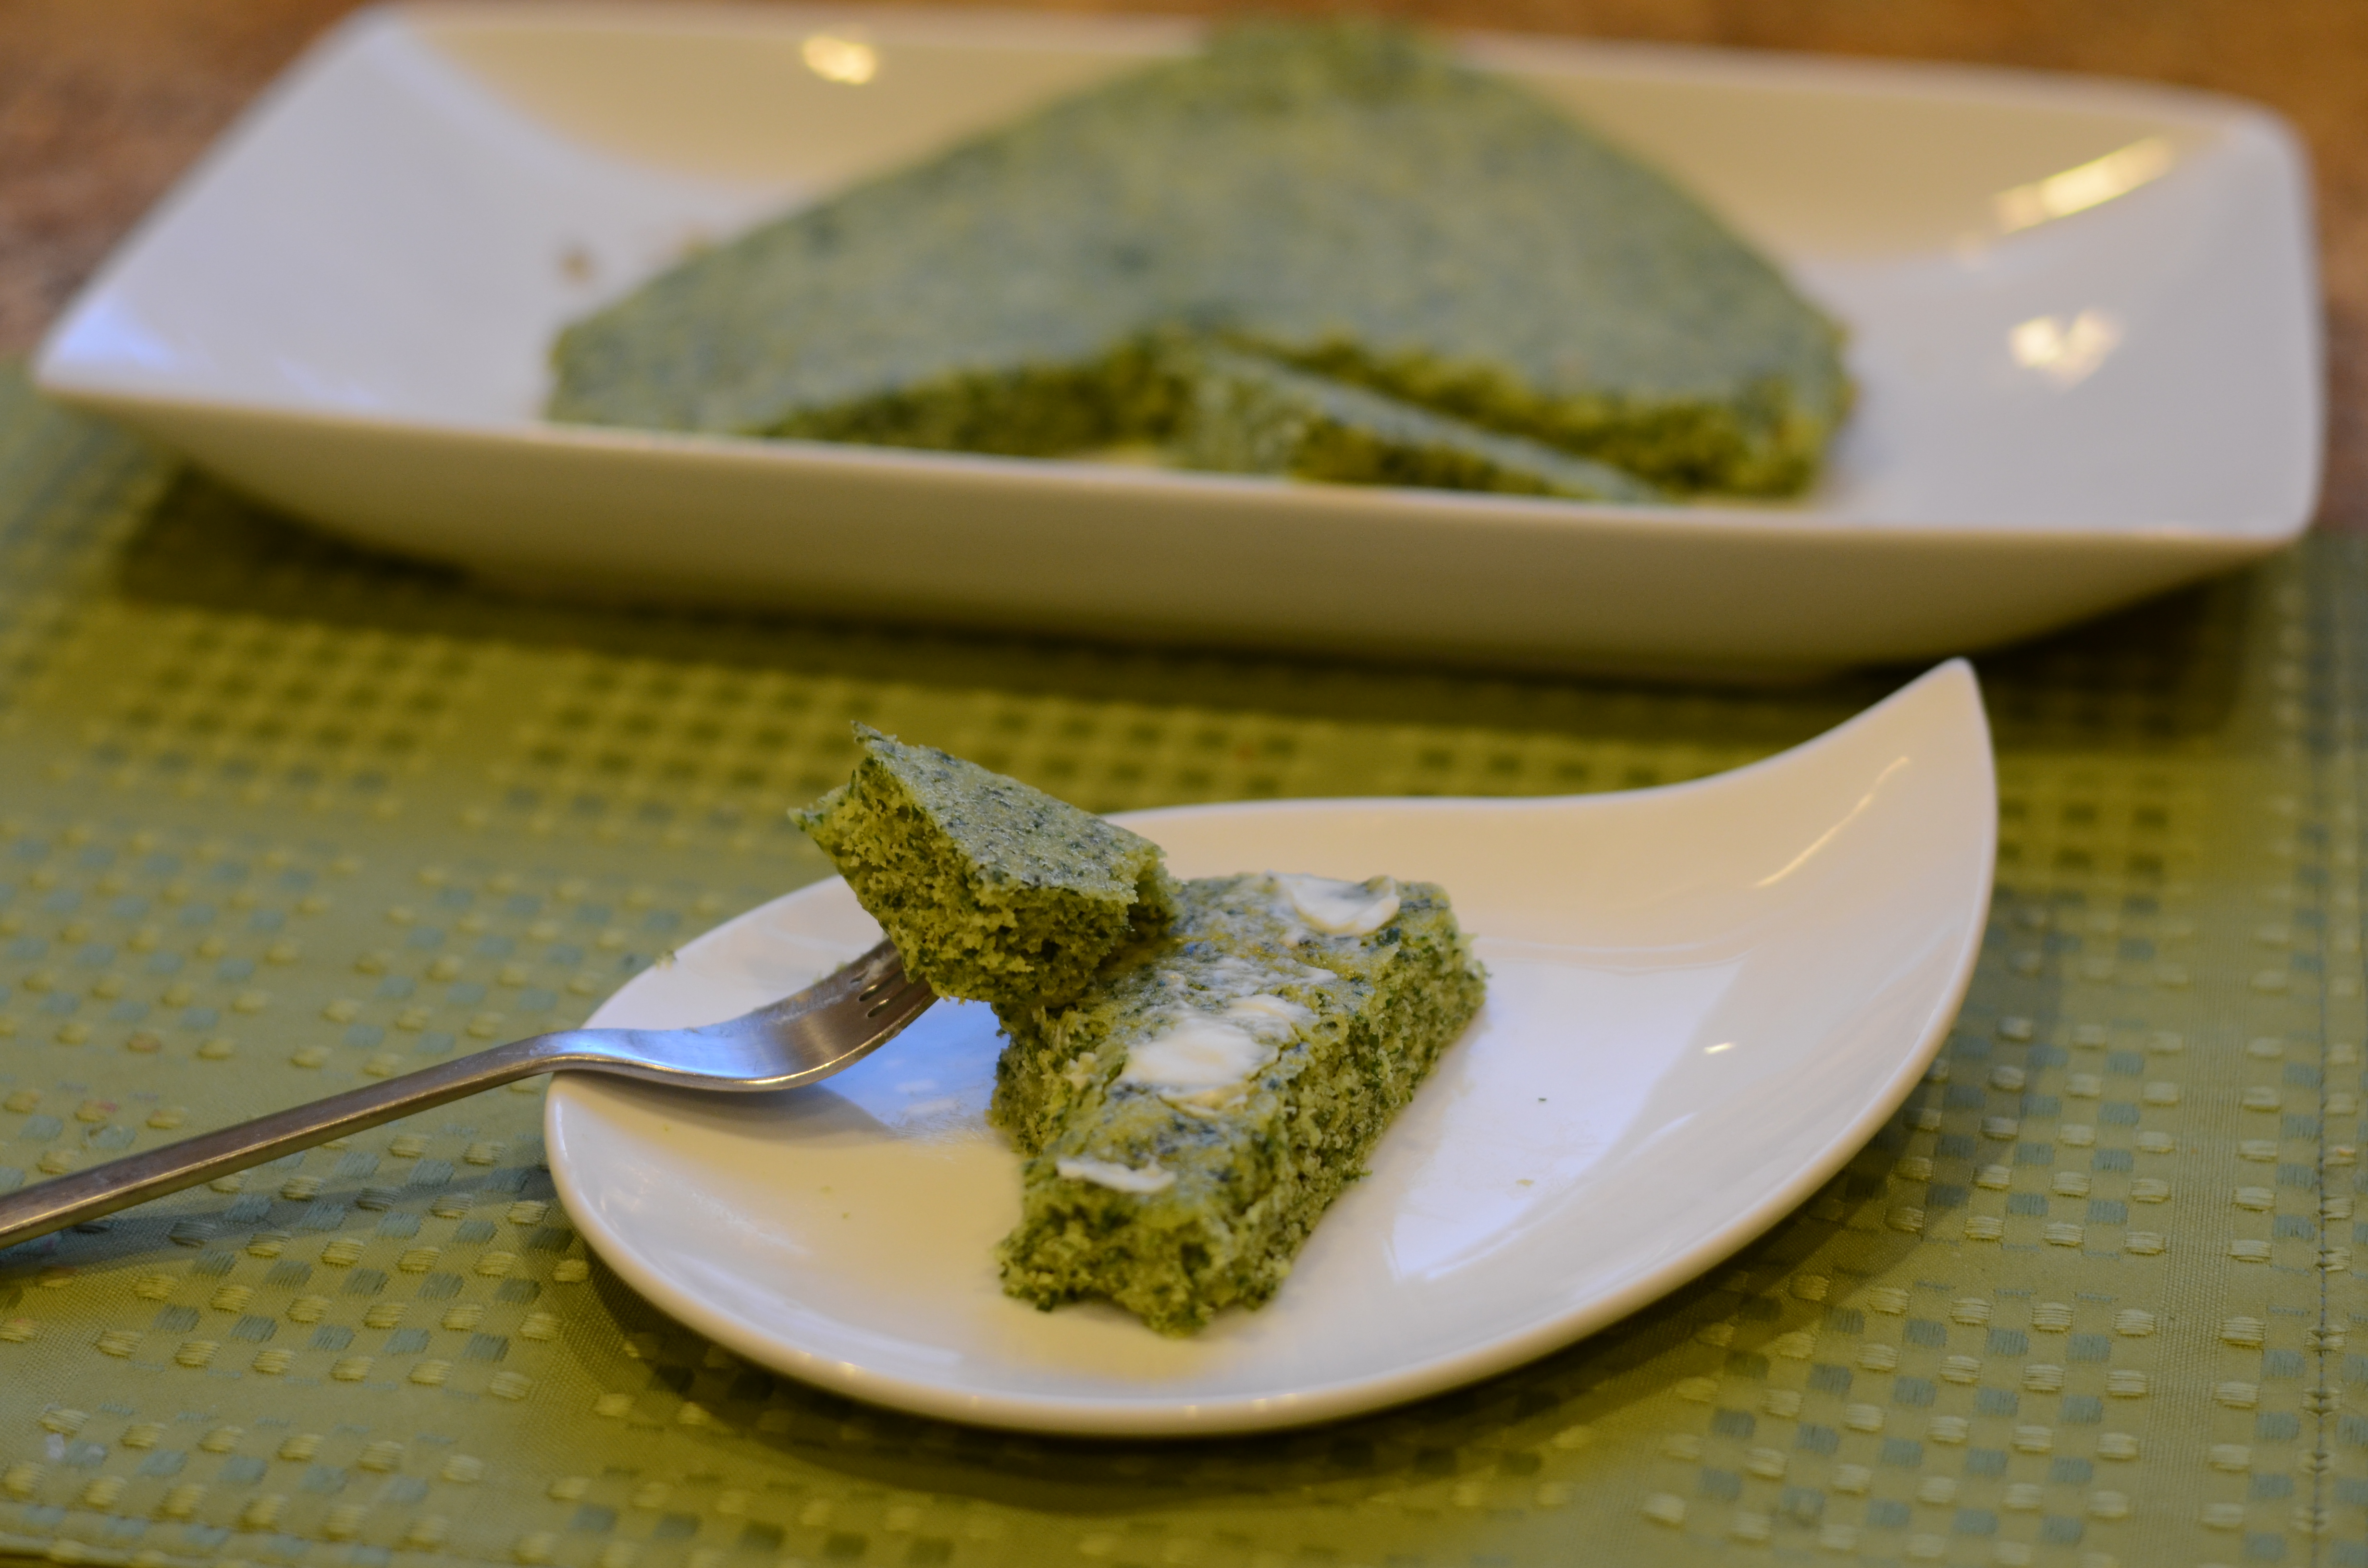
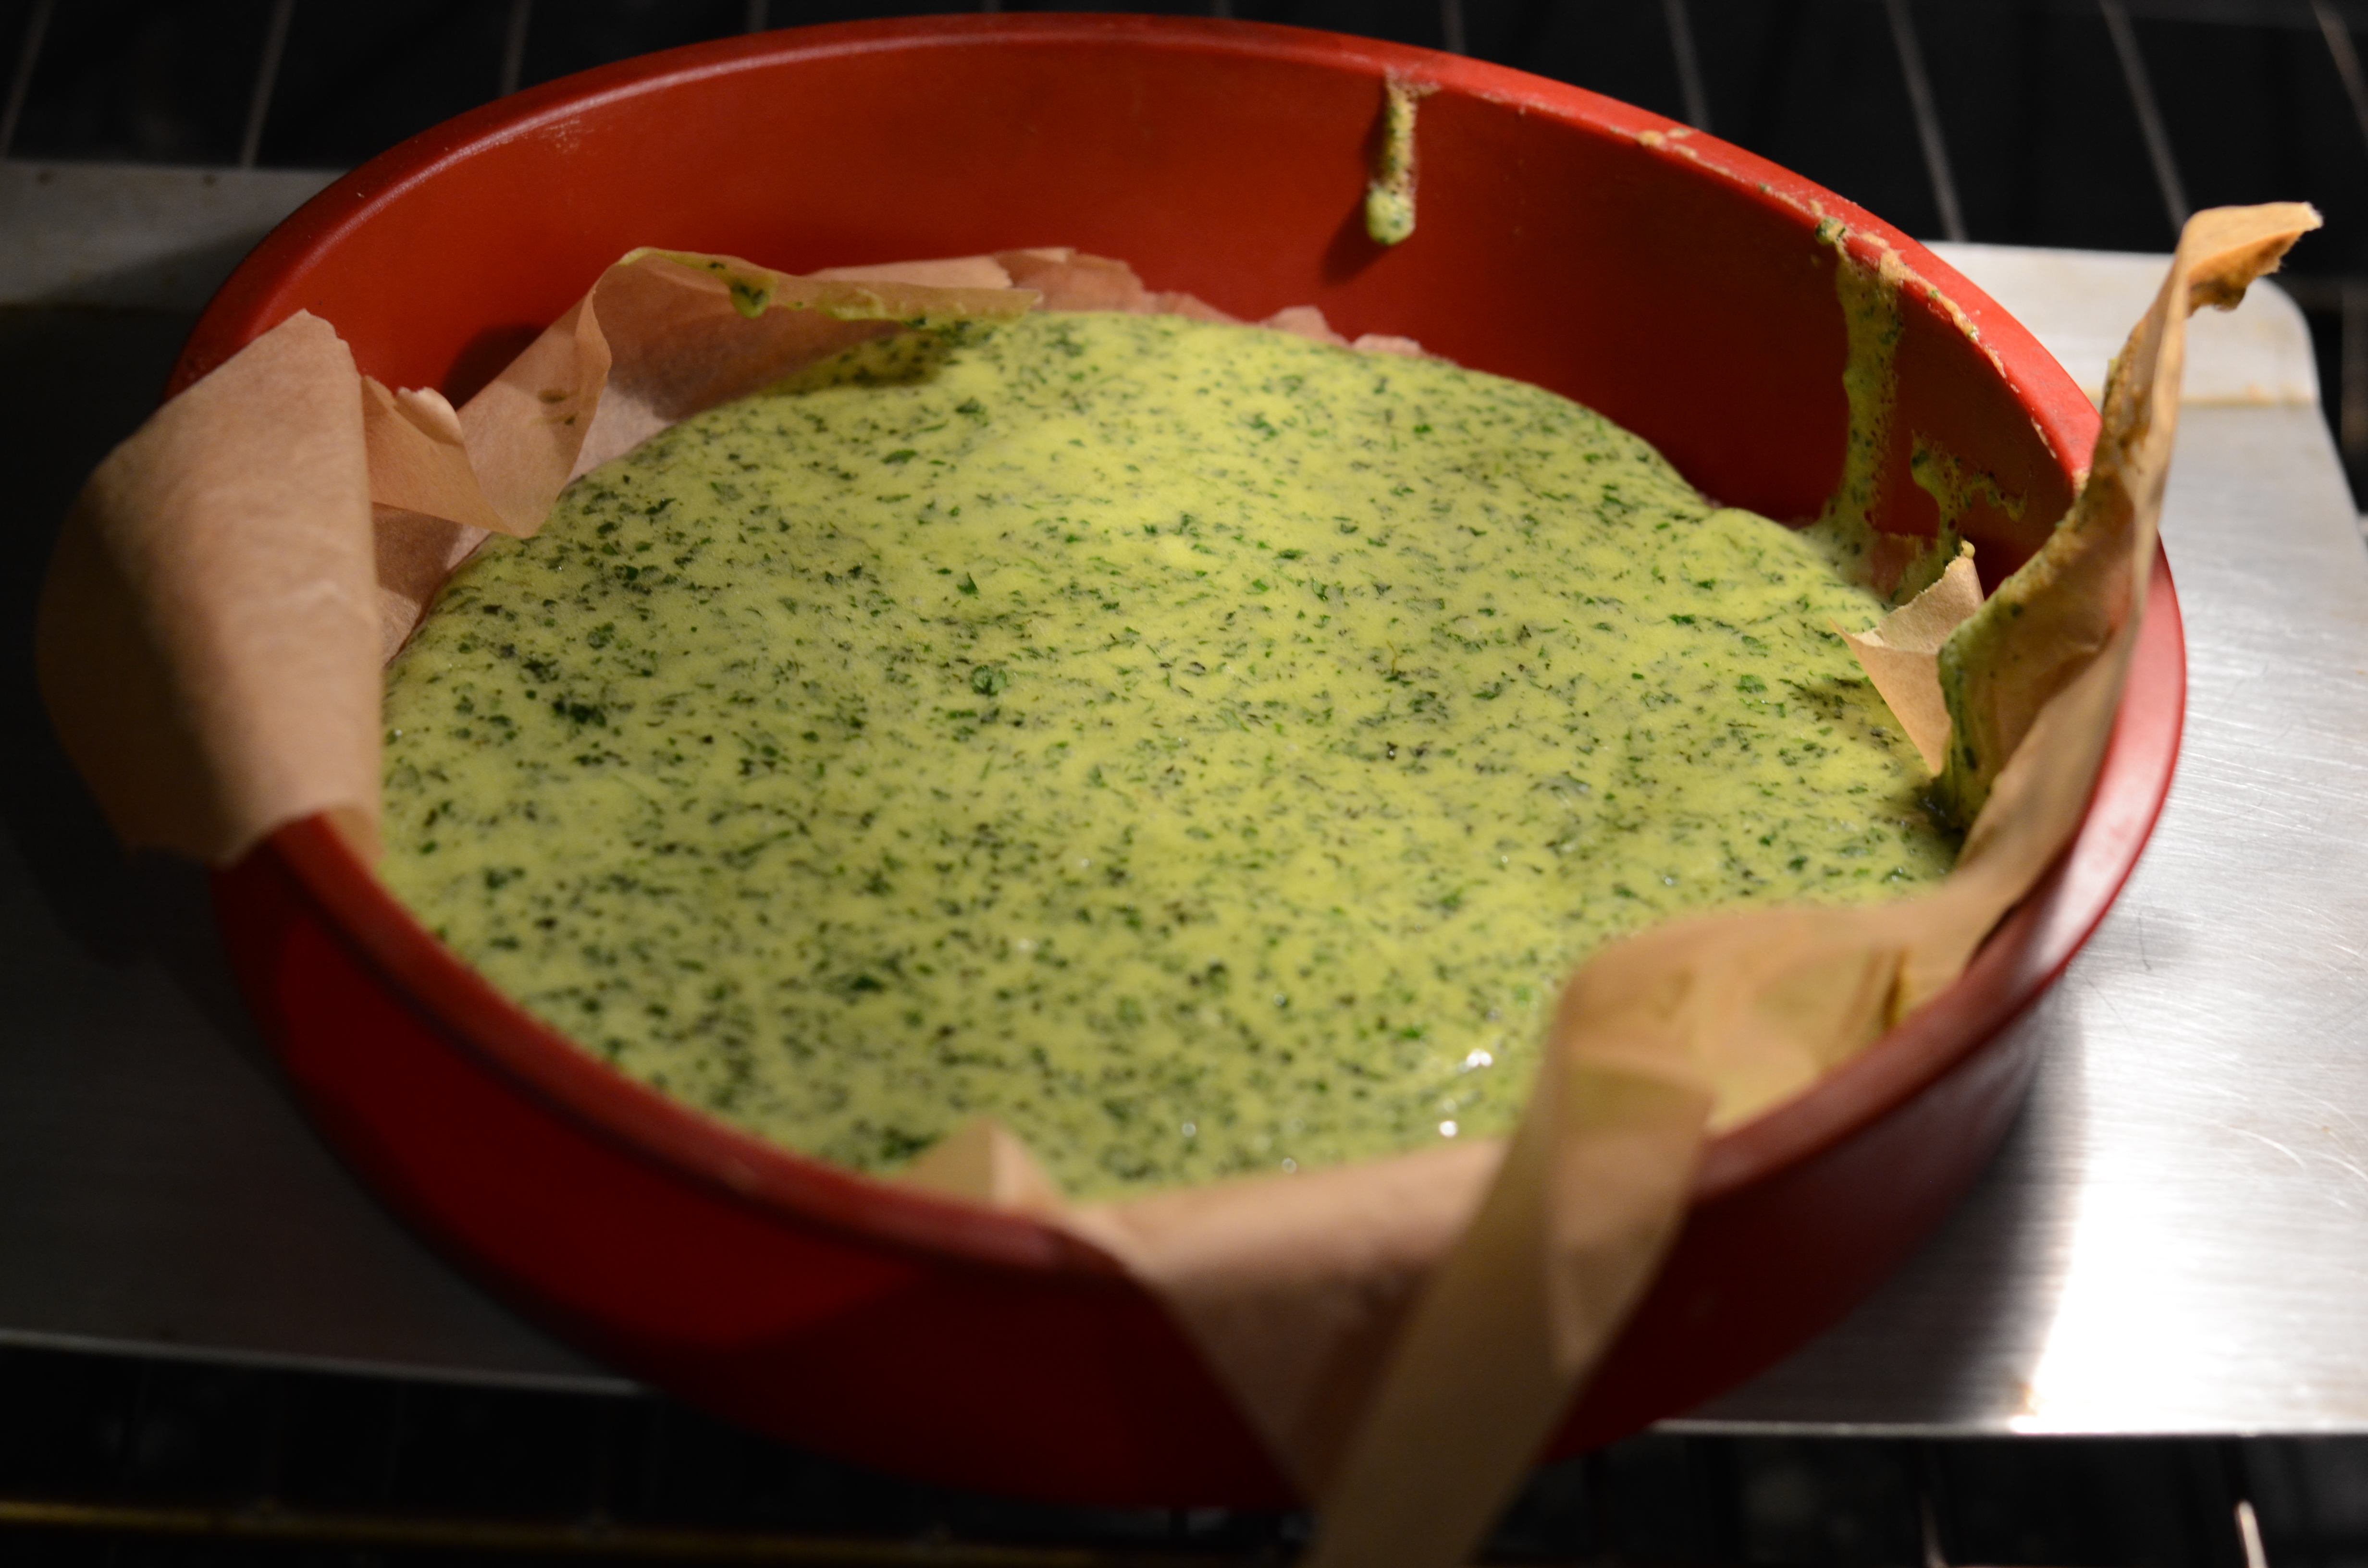
Time to bake! Preheat the oven to 340°F. Bake time will vary significantly 12-20 minutes, so be sure to use a toothpick or cake tester to check for doneness. Rotate the cake at about 8 minutes. The top should only brown slightly; turn the heat down if it becomes too brown.
DSC_6806
Let cake cool in the pan. To serve, make serving-size squares or wedges of cake. The cake may be delicious with vanilla ice cream and lemon zest. Mine was enjoyed warm with butter.
DSC_6818
The cake was excellent, particularly the texture. I must have enjoyed olive oil cakes in restaurants before, but I don’t think I ever made it at home. This cake also had a wonderful herbal aroma–honestly, the best way to describe it is a mojito smell! I was skeptical about the cake’s appeal, and wondered if the color would be “too much” for some people. One of my favorite ways to keep food from being wasted is to share it with others, so I brought several plain pieces to test on–I mean, offer to– my church bells choir-mates at rehearsal.

As it turned out, no one even hesitated to try the cake. Everyone liked it. I would like to believe it was not only because they were in a festive St. Patty’s Day mood.
DSC_6816

Spice-Roasted Salmon with Green Beans and Rice

The whole spring-forward-daylight-savings-thing is a killer. In spite of the fact I tried to go to bed early last Saturday night, I was dragging every morning thereafter. My distaste was only slightly dampened by noticing sunlight later in the evenings. If only there was a way to experience the thrill of extra daylight without losing sleep. Can’t the clock switch from 4:00 to 5:00 pm on a Monday?

I really didn’t feel like cooking when I got home from the gym last Tuesday evening. I was tempted to make my dinner out of a mishmash of snacks and cheese; maybe I’d go as far as to open some boxed pasta or a can of beans. The fact that I had fresh fish in the refrigerator, waiting to be cooked, meant I needed to overcome these impulses.

I’m glad I sucked it up. It doesn’t take long to put together a fresh, complete weeknight meal like this, getting in my omega 3s and vitamins. Green beans and salmon cook quickly (especially with subjective measures of done-ness, so you can be even quicker if you want) and rice is hands off. I only had to chop 3 small things and measure a couple of others. Easy breezy!

The spice seasoning for the fish is garam masala. I have been making garam masala by toasting fresh whole spices at home, and one of the last times I made it, I made a pretty large batch.
DSC_6741
While we’re on the topic of spices, I have a reason to mention my spice cabinet organization.
DSC_6734
As you can imagine, it can be hard to keep track of a dozen little by-the-ounce plastic baggies of spices. Occasionally I relocate them to other empty spice containers, but they take less space in the bag. I found stackable plastic flat containers at the Container Store which have 6 shallow compartments. I can arrange several spices front to back in the compartments. Then I label the front with dry erase marker with each item in order. This way, I can see what I have with a quick glance, and I’m maximizing the space.
DSC_6730

What’s my organizational scheme for the rest of the spices? Well, you know how it is with your own kitchen. I just have a feel for where to find certain ones, particular ones that are used together in the same recipes. This is one of the reasons it is so utterly challenging to cook in someone else’s kitchen, isn’t it? (At least, the majority of someones who don’t alphabetize their spices.)

Back to the cooking! A note on timing and temperature: the steps to this meal include boiling some basmati rice, blanching the green beans, sautéing the green beans, and pan-roasting the fish. My husband will tell you, I have a “thing” about my food being served at the proper temperature (and I pay close attention to this at restaurants). That usually takes the form of me wanting hot food to be served noticeably hot. You’re going to want to eat your salmon freshly cooked, so it should be the last thing you finish, obviously. I wanted to minimize dirty dishes, so, while the rice was cooking, I blanched the green beans and then sautéed them first in the same pan I planned to use for the salmon. While the salmon was finishing up later, I gave the beans a quick reheat in the emptied blanching pot.

Then everything got cold as I was taking pictures, of course. No one ever mentions that!

Spice-Roasted Salmon with Yogurt Sauce
For 2
Adapted from Cooking Light

1 1/2 tablespoons olive oil, divided
2 sustainable salmon fillets, 6 ounces each
1/2 teaspoon garam masala
1/4 teaspoon kosher salt,
divided
about 4 Tablespoons plain Greek yogurt, 2% preferred
1 Tablespoons green onions
, thinly sliced, plus extra to garnish rice
1/2 teaspoon fresh lime juice
1 lemon
, cut into wedges

Heat a large skillet over medium-high heat. Add 2 teaspoons oil to pan; swirl to coat.

Sprinkle fillets evenly with garam masala and 1/2 teaspoon salt. Add fillets to pan, skin side down. Cook about 7 minutes; turn over, and cook 1-2 minutes or until desired degree of done-ness and temperature.
DSC_6745
DSC_6746
While the salmon is cooking, combine ingredients for the sauce. Whisk 2 1/2 teaspoons oil, 1/8 teaspoon salt, yogurt, green onions, and lime juice in a small bowl.

The original recipe called for a combination of creme fraiche or sour cream and yogurt for the sauce. I only had Greek yogurt, which is my go-to substitute for creme fraiche and sour cream anyway, so I used the yogurt alone. It still tasted great to me.

Dollop mixture onto fillets, when serving, along with lemon wedges on the side.


Indian-spiced Green Beans

From Martha Stewart Living

1 teaspoon kosher salt
, plus more for seasoning
1 pound string green beans, stem ends trimmed
2 teaspoons vegetable oil
1 teaspoon brown mustard seeds
1/2 large or 1 small yellow onion (about 4 ounces
), thinly sliced into rounds or half-moons
2 teaspoons fresh ginger, minced

DSC_6727

Remember, you can keep your fresh ginger in the freezer to make it last so much longer!

Remember, you can keep your fresh ginger in the freezer to make it last so much longer!


Bring a pot of water to a boil. Fill a large bowl with ice and water. Once water is boiling, add 1 teaspoon salt and string beans.
DSC_6725
Cook about 3 minutes (the beans should turn bright green), and drain into a colander. Transfer to ice bath and slosh the beans around. Drain again.

Set the large skillet over high heat, and add vegetable oil. When hot, add mustard seeds, and cook about 30 seconds, until seeds start to pop.
DSC_6736
Add onion, and cook, stirring until they begin to brown, 3 to 4 minutes. Add ginger, and cook 1 minute more. Add reserved string beans, and cook, stirring until hot. Season with salt to taste.
DSC_6738

Dinner is served! I realized later that my salmon was incorrectly placed here with the skin side up.

Dinner is served! I realized later that my salmon was incorrectly placed here with the skin side up.

Mmm, that's better.

Mmm, that’s better.

Peel to Flesh Movement: Orange Currant Scones

I’m a regular reader of the New York Times, and that includes reading the Dining section every week. When I come across recipes I like online, including those in the Times, I log the links into an ongoing list. I will refer back to that list and pull from it once I’m ready to execute something. I realize this approach is kind old-fashioned–I do use Pinterest for other purposes as well–but old habits die hard. This has been working fine. And now my blog serves as a way to organize the recipes that I have tried and like!

My saved recipe list has been populated with several New York Times web addresses lately, and I noticed that many of them are comfort food. There’s the meat and potato gratin, the oatmeal sandwich cookies, the biscuits, and the polenta with sausage. Don’t these all sound good? Perhaps everyone has given up on the idea of spring ever arriving and decided to settle into a semi-permanent hibernation.

The first of these recipes I have gotten around to making is the Orange Currant Scones recipe. I don’t know about you, but I’m not one to enjoy cluttering my home with lots of “stuff.” Except, when it comes to kitchen gear, I’m always tempted. I gush over the King Arthur Flour, Chefs, and Williams Sonoma catalogs like the average man does over Victoria’s Secret. I haven’t felt the need to pull the trigger on a scone pan, and apparently I was making the right decision–this recent article assured me “nothing besides tradition calls for round biscuits or wedge-shaped scones.” It explains that you want to minimize the dough’s absorption of flour, and additional rolling, like when you gather up scraps after using a round biscuit cutter, causes the flour’s gluten to activate more and makes the biscuits or scones tougher. Pushing the dough into wedge spaces in a pan doesn’t allow for the flakiest layers. Instead, cutting the dough sharply in whatever shape you want helps the sides rise up.

I was excited to snag blood oranges at my latest visit to Wegman’s. My plan was to make a salad with blood orange segments. Around the same time, I read this recipe. Since segmenting oranges for a salad leaves the rind available, I first zested the outer peel and reserved the zest for my scone recipe. Like the “Nose to Tail” Whole Animal Movement, why don’t we start a “Peel to Flesh” Whole Fruit Movement! One can go so far as to reserve all the rind/peel and candy it following a recipe like this. Though with much of the zest removed, I wonder if it would be overly bitter. I’ll try next time and let you know!

Best sure to thoroughly wash the outside of citrus fruits you are zesting, since pesticides and other residue can cling to the peel. Ideally the fruit is organic for these purposes. You don’t want waxy coatings.

DSC_6679
Orange Currant Scones
From the New York Times online

3 Cups all-purpose flour
2 Tablespoons white sugar
1 Tablespoon baking powder
Grated zest of 1 orange or tangerine

1/4 lb (1 stick) unsalted butter, cold and cubed
1 large egg, lightly beaten
1 Cup heavy cream
2-3 Tablespoons water or milk
, if needed
1 Cup dried fruit chunks – currants, cranberries, raisins etc.
Egg wash (1 large egg beaten with 1.5 teaspoons water)
2 Tablespoons brown sugar, for sprinkling

Pre-heat oven to 325 degrees. Prepare your sheet pan with a nonstick lining like parchment paper or a Silpat.

Toss dry ingredients and zest together in a large bowl.
DSC_6681
If your butter has started to soften as you cubed it, return to refrigerator or freezer for a few minutes to firm it up again.

This is the hard/annoying part (maybe because I also refuse to buy a pastry cutter): rub butter into the flour mixture together using a pastry cutter or your fingers until butter pieces are the size of peas and covered with flour.

I did my best.

I did my best.


Prepare your floured cutting board and measure your fruit now, because things are about to get messy.
DSC_6683
Make a well in the center of the bowl and pour in egg and cream.
DSC_6690
Mix ingredients together by hand until a shaggy dough is formed.

Here’s where you might face a problem, like I did. My mix was more shag and less dough. It is very possible that my “large” egg was smaller than other “large” eggs that went into more successfully executed doughs. Or the flour measurements weren’t perfect. If your dough will not stay together, add a little water until it will stay in one piece. Note that it is OK for it to be somewhat dry/floury otherwise; this isn’t a cookie or pizza dough. But take notice early on of excessive dryness so you don’t over-blend the dough, as warned above. I went a little overboard, because I was convinced there was some way it would eventually come together, since I followed the recipe exactly. As a result, my scones didn’t come out as flaky as they should.

On a floured surface, knead the fruit into the dough gently, just until incorporated. Pat into a rectangle about 3/4-1 inch thick.
DSC_6693
Don’t judge: these currants might be from last St. Patrick’s Day (when one usually makes another scone-like treat in the form of Irish Soda Bread) so they sorely needed to be used up. I didn’t have quite enough, so cranberries filled in for the rest.

Using long, sharp cuts, separate the dough into 8 or 12 smaller rectangles. Move to baking sheet.
DSC_6694
Brush tops with egg wash and sprinkle with brown sugar.
DSC_6696
At this point, you could pause the recipe by placing the pan in the freezer, which I did. Giving the worked dough a rest is actually suggested on the scones recipe entry on King Arthur Flour’s website. I was fortunate to find this information after I had already made the dough, because I ran out of time to bake them and, in my ignorance, was concerned it might actually be harmful to freeze them before baking. The “tips for bakers” section here is very helpful to read before making scones. If I hadn’t been so hasty and did more general research, I would have learned that flour dries out in dry weather like this winter, which explains the need for more liquid.

From frozen, bake for about 25 minutes, turning the pan halfway through, until light golden brown. Allow to cool slightly on the baking sheet. Enjoy warm or at room temperature. Freeze any that aren’t going to be consumed within a day so they stay somewhat fresh.
DSC_6700

Be mesmerized by my fancy plate.

Be mesmerized by my fancy plate.